Posted by: christian on 21 Sep 2015
On Sunday my daughter and I planted some cress seeds. The packet claimed that it contained an average of 500 seeds, so here's an attempt to validate that claim using Python. We planted the seeds on kitchen towel, so there is a good contrast between the seeds and the background (click for the full size image).

We'll count the seeds by adding up the number of pixels comprising the seeds and dividing by the average number of pixels per seed. First, let's extract a region for calibration (the below is a rotated region from the left hand side of the original image).

Now we'll use the Pillow imaging library, NumPy, and pylab to load and inspect the image, seeds_21.jpg.
In [1]: from PIL import Image
In [2]: import numpy as np
In [3]: import pylab
In [4]: calibration_image = Image.open('seeds_21.jpg')
In [5]: calibration_array = np.array(calibration_image)
In [6]: calibration_array.shape
Out[6]: (825, 162, 3)
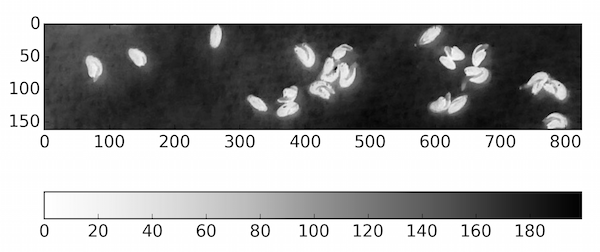
The first two dimensions of the array here are the height and width of the (unrotated) image in pixels. The final dimension holds the pixels' red, green and blue values. The seeds are kind of reddish, so we'll use the values of the blue channel (index 2) which will be high for the white background and low for the seeds. Using pylab,
In [7]: import matplotlib.cm as cm
In [8]: pylab.imshow(calibration_array[...,2], cmap=cm.Greys)
In [9]: pylab.colorbar(orientation='horizontal')
In [10]: pylab.show()
Which values to assign to the seeds and which to the background is a matter of judgement. This is one of the (few) cases that the default matplotlib "jet" colormap is useful:
In [7]: import matplotlib.cm as cm
In [8]: pylab.imshow(calibration_array[...,2])
In [9]: pylab.colorbar(orientation='horizontal')
In [10]: pylab.show()
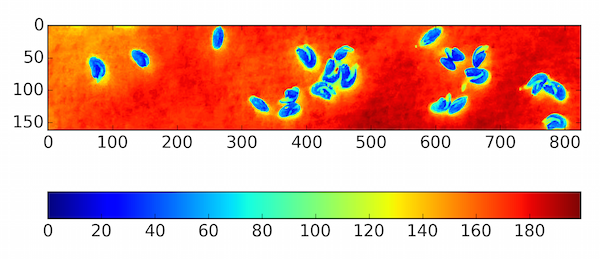
100 seems to be a decent threshold value, so given there are 21 seeds in this calibration image, we can calculate the grain size in pixels:
In [11]: grain_size = np.sum(calibration_array[...,2] < 100) / 21
In [12]: grain_size
Out[12]: 554.47619047619048
Then, with the original image, seeds_all.jpg:
In [13]: image = Image.open('seeds_all.jpg')
In [14]: arr = np.array(image)
In [15]: nseeds = np.sum(arr[...,2] < 100) / grain_size
In [16]: nseeds
Out[16]: 540.74639299209889
which is within the 10% of the claimed value of 500.
Share on Twitter Share on Facebook
Comments
Comments are pre-moderated. Please be patient and your comment will appear soon.
Fernando Gomez 6 years, 4 months ago
Hi, I really like you posts, I am learning a lot with these. I have been trying to do exactly what you are doing here but when I do the step:
Link | Replygrain_size = np.sum(calibration_array[...,2] < 100) / 21
Igrain_size
nothing happens, I wait several minutes but not result comes out so I give up. Is it possible that it takes that long? I just reproduced what you did, exactly.
Any help will be welcome
FER
christian 6 years, 4 months ago
That's odd – do the images display OK? And does calibration_array have the correct shape, (825, 162, 3)?
Link | ReplyWhich version of PIL / Pillow and NumPy are you using? And are you definitely using Python 3?
Eden 4 years, 5 months ago
hi I am also facing the same problem, your code is not displaying any thing at all
Link | Replychristian 4 years, 5 months ago
It would be helpful to know what version of Python, Pillow, NumPy, etc. you are using: I find it still works with Python 3.7, Pillow 6.1, NumPy 1.16.4.
Link | ReplyNew Comment